It is critically important to have an effective Infection Control program in the Dental Office. The safety of you and your patients depends upon properly cleaned and sterilized instruments that do not transmit infectious organisms/diseases between patients or between your patient and you. Different dental disciplines may have slightly different infection control practices. For example, the oral surgeon may put additional emphasis on aseptic technique, the importance of low linting materials, and the need for stringent attention to sterilization procedures as they are performing more invasive procedures. This program addresses practices and recommended protocols for packaging and sterilization of dental instruments and outlines different packaging options for sterilization.
Risk of Infection
If instruments and other dental supplies are not properly sterilized or disinfected as required, there is a risk to both patients and dental health care personnel. Exposures to pathogenic microorganisms cited in published articles include:
- Cytomegalovirus (CMV)
- Hepatitis B Virus (HBV) and Hepatitis C Virus (HCV)
- Herpes simplex virus Types 1 & 2
- Human Immunodeficiency Virus (HIV)
- Mycobacterium tuberculosis
- Staphylococci
- Streptococci
- Multiple respiratory and oral pathogens
Depending on the pathogen, it may be transmitted to patients and/or staff via:
Direct contact with blood, oral saliva or other body fluids
- Indirect contact with contaminated instruments, equipment or surfaces
- Splatter or spray of mucosa (including mouth, nose, respiratory tract and eyes) with contaminated fluids
- Inhalation of pathogen-containing aerosols (droplet or airborne)
Related Article
OSHA (Occupational Safety and Health Administration)
OSHA’s mission is to save lives, prevent injuries, and protect the health of America’s workers. As part of the Department of Labor, OSHA (and the states that operate OSHA-approved state plans) establishes guidelines and standards to promote worker safety and health that apply to every workplace in the United States, including medical and dental offices.
The most frequently requested and referenced OSHA standard affecting dental offices is OSHA’s Bloodborne Pathogens Standard (29 CFR 1910.1030).
Some basic requirements of the OSHA Bloodborne Pathogens standard include:
- A written exposure control plan, to be updated annually
- Use of universal precautions
- Consideration, implementation and use of safer, engineered needles and sharps
- Use of engineering and work practice controls and appropriate personal protective equipment (gloves, face and eye protection, gowns)
- Hepatitis B vaccine provided to exposed employees at no cost
- Medical follow-up in the event of an “exposure incident”
- Use of labels or color-coding for items such as sharps disposal boxes and containers for regulated waste, contaminated laundry and certain specimens
- Employee training
- Proper containment of all regulated waste
Infection Control Practices
Principles of Infection Control: According to The Organization for Safety, Asepsis and Prevention (OSAP)
- Take Action to Stay Healthy and get vaccinated against Hepatitis B and other vaccine-preventable diseases.
- Avoid Contact with Blood and Body Fluids and use Standard Precautions – handwashing, gloves, eyewear and facial protection; implement controls to prevent injuries – and treat every patient as if infectious.
- Limit the Spread of Blood and Body Fluid Contamination. These can be spread through spatter, by touching supplies and by laying a contaminated instrument on a clean surface. Any contaminated item or surface becomes a potential source of exposure.
- Make Objects Safe for Use. Always clean then sterilize, instruments before they are used again. Likewise, before seating the next patient, clean, then disinfect, any unprotected surfaces that became contaminated.
Making Objects Safe for Reuse
Current Centers for Disease Control and Prevention (CDC) Guidelines for Infection Control in Dental Health Care Settings provide guidance on the classification and sterilization or disinfection of dental instruments. Dental instruments should be classified as:
Critical – Surgical instruments and other invasive devices used to penetrate soft tissue or bone. These should be sterilized after each use. Examples are: forceps, scalpels, bone chisels, scalers and burs.
Semi-Critical – Instruments that do not penetrate soft tissues or bone but contact oral tissues. These devices should be sterilized after use unless the instrument will be damaged by heat. If this is the case, at a minimum they should be high-level disinfected. Examples include mirrors and amalgam condensers.
Noncritical – Instruments that come into contact only with intact skin. These may be processed between patients by low-level or intermediate level disinfection. Examples are the external components of X-Ray heads, pulse oximeters and stethoscopes.
The Centers for Disease Control and Prevention (CDC) recommends sterilizing instruments by steam under pressure (autoclaving), dry heat or chemical vapor depending upon the instrument manufacturer’s instructions. Some articles state that steam sterilization is the most reliable in producing sterile instruments6,8, and most dental practices use steam autoclaves to process reusable patient care items (OSAP).
Preparation
Hold instruments in solution to make them easier to clean later. Use an enzymatic pre-soak or cleaner, (or even dishwashing detergent). Do not use a sterilant/high-level disinfectant as a holding solution. (Glutaraldehydes can bind protein to surfaces.) Do not soak in hypochlorite (bleach) or saline solutions as chloride ions corrode instruments. Before sterilization, all items to be sterilized must be scrupulously cleaned to remove any debris. Any soiling, whether organic or inorganic debris left on devices, can prevent the sterilant from gaining access to the device surface beneath. Thus, if tissue, blood, mineral deposits, etc., are seen on the device after sterilization, the device must be considered non-sterile. All critical and semi-critical dental instruments that are heat stable should be sterilized by steam sterilization routinely between uses.
Selection of Packaging
AAMI (Association for the Advancement of Medical Instrumentation) is an alliance of healthcare professions which provides consensus and timely information on medical instrumentation and technology and is the primary resource for the industry, the professions, and government for national and international standards.
AAMI ST 79 “Comprehensive guide to steam sterilization and sterility assurance in health care facilities,” recommends that an effective packaging material for steam sterilization processing should, as a minimum:
- Allow adequate air removal from and steam penetration of the package contents
- Provide an adequate barrier to microorganisms or their vehicles
- Resist tearing or puncture
- Allow a method of sealing that results in a complete seal that is tamper-evident and provides seal integrity
- Allow for ease of aseptic presentation
- Be free of toxic ingredients and non-fast dyes
- Be non-linting
- Be cost-effective
Common packaging materials used in Dental Practice

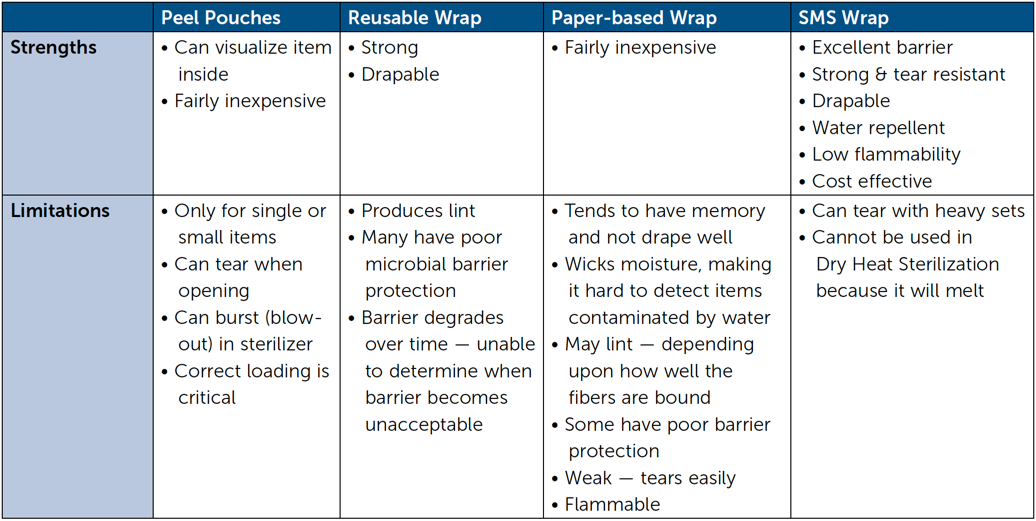
After thoroughly cleaning, drying and inspecting dental supplies, assemble them into sets or trays for wrapping. Some small individual items may be placed into peel pouches. Always place critical and semicritical instruments that will not be used immediately into sterilization packaging (SMS wrap, peel pouch, etc.) It is not appropriate to re-use pouches or wraps that have been designated single-use. See Table above for Strengths and Limitations of common packaging options for Dental Practices.
Monitoring
In order to be assured that equipment is working properly, all sterilization cycles must be monitored utilizing 1) physical monitors (like charts, gauges on the sterilizer), 2) chemical monitors [Chemical Indicator (CI)] and 3) biological monitors [Biological Indicator (BI)], to indicate that the proper parameters for sterilization were achieved.
- Sterilizer charts, gauges, print-outs, etc. can be found on the sterilizer itself and will vary from sterilizer to sterilizer. Check the sterilizer manufacturer’s directions for use (DFU) to be sure these are reading as expected.
- Chemical indicators are strips containing dyes which respond (usually by changing color) to the different sterilization parameters (i.e., temperature, time, etc.) These strips are placed inside every package to be sterilized and are also affixed to the outside of opaque packages.
- The Biological Indicator contains bacterial spores which are very hard to kill. For each sterilization method, testing has been performed to show which spore is the most resistant to that particular form of sterilization, and therefore, that is the spore used in the BI to monitor it. According to AAMI, a BI needs to be run at least weekly and with every load that contains an implantable device.
Sterilization Process
Biological Indicator Monitoring for common sterilizers in the Dental Office

Some experts recommend that a BI also be run every time something is changed in the instrument preparation procedure or sterilization process, such as a packaging change, device or package content change, repair of the sterilizer, etc.
The BI is placed in its own test pack and placed in the sterilizer. After the sterilizer cycle is complete, the “sterilized” BI is removed from its test pack and incubated at the proper temperature. An unprocessed BI is also placed in the incubator as a positive control. See Table above for correct BIs and incubation temperature for three common sterilizers.
Wrapping Dental Instruments
AAMI ST 79 states that before use, packaging materials should be held at room temperature (20°C to 23°C [68°F to 73°F]) and at a relative humidity ranging from 20% to 60% for a minimum of 2 hours. All packaging materials, woven or nonwoven, should be examined regularly for defects and extraneous matter. Policies and procedures should be developed for packaging techniques and should be consistent with the manufacturer’s recommendations. Double-wrapping is recommended for terminal sterilization in acute care settings, and double-wrapping may be prudent for some dental items – depending upon strength and barrier requirements. If only a single wrapper is used, it is especially important that it provide excellent barrier protection. So look for packaging which provides the highest level of barrier protection possible.
Advantages to wrapping with 2 sheets
Barrier:
- Two layers simply provide a larger/longer more tortuous path to stop microorganisms from entering the package.
- One layer may snag and tear but the other layer may remain intact. Or, if a breach happens in one layer, and a breach happens in the other layer for an entirely different reason, chances are very unlikely that these will perfectly line up to allow an unobstructed pathway for microorganisms to enter.
Strength:
- Two sheets move over each other and provide more loft and cushion for the packaged item to mitigate tearing.
Step-by-Step – How to Wrap
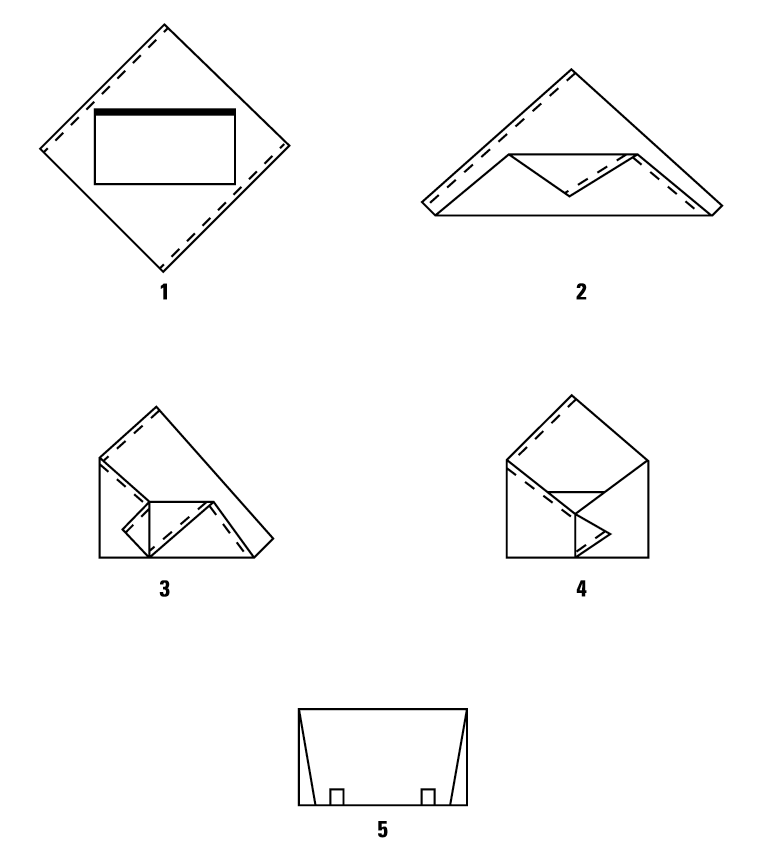
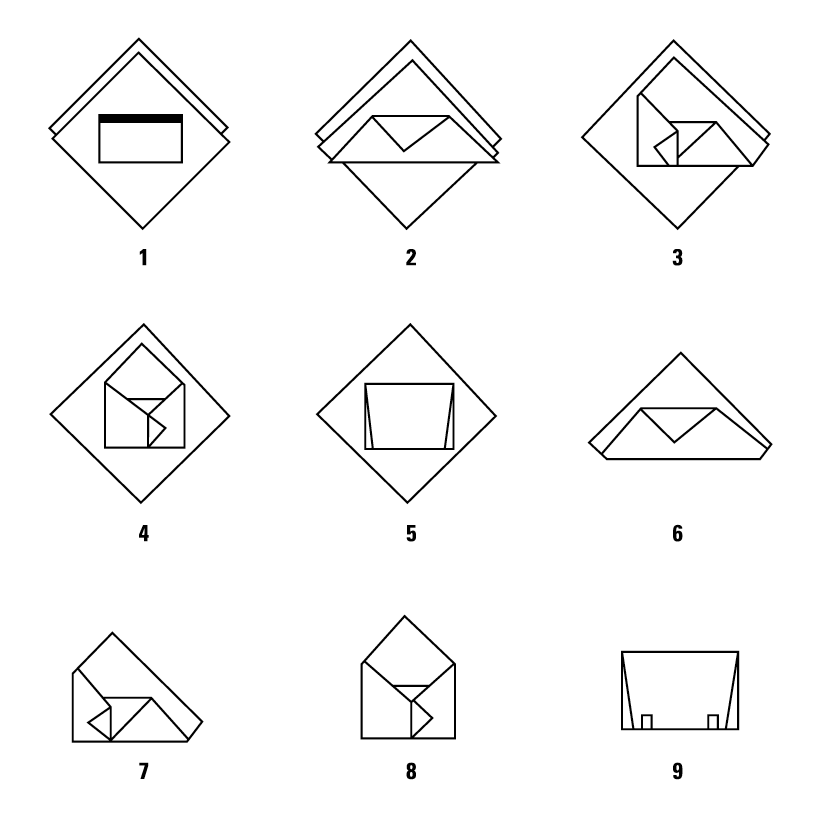
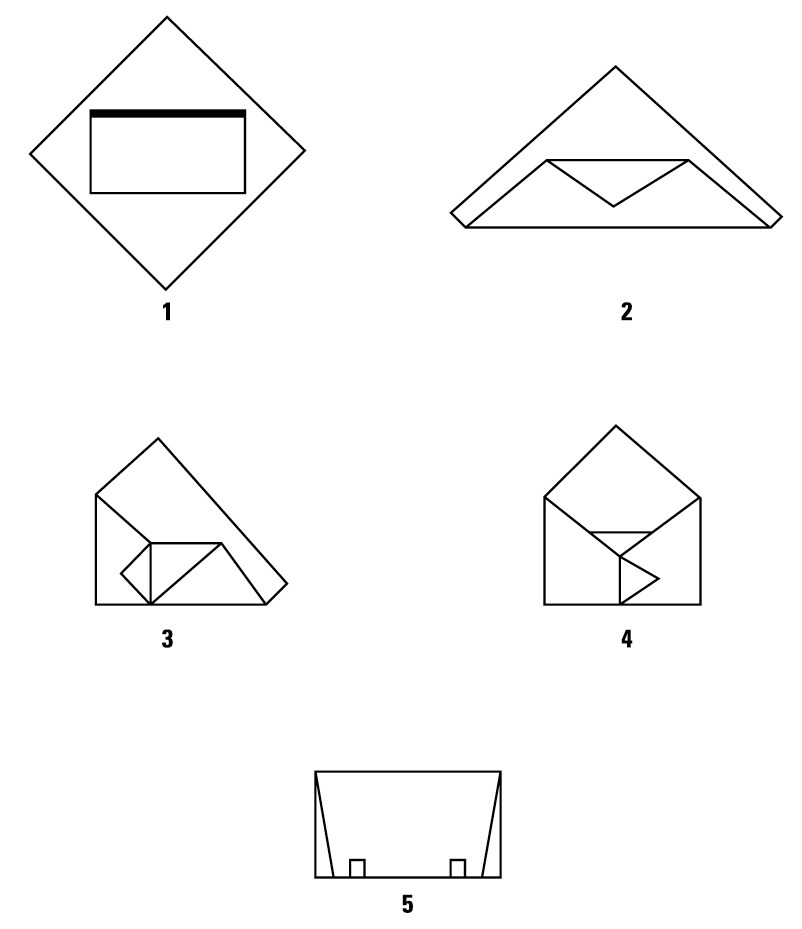
Shown are two double-wrapping and a single-wrapping technique:
Double Simultaneous (Two sheets bonded together) Wrapping, Envelope Fold

Double Sequential (Two single sheets) Wrapping, Envelope Fold

Single Sheet Wrapping, Envelope Fold

Secure Package with Sterilization Indicator Tape
Package Closure
AAMI recommends securing a wrapped package with a sterilization indicator tape. Do not use tapes other than sterilization indicator tape. Also do not use safety pins, paper clips, staples, or other sharp objects. There are different indicator tapes available for use on different materials. If you are using an SMS polypropylene wrap you may need to use a sterilization indicator tape specifically designed for this material, often referred to as: “Steam Indicator Tape for Disposable Wraps” and typically it is a “bluish” color (as opposed to a beige-tan).
Sterilization
Current Sterilization Methods used in Dental Practices:
Moist heat/steam sterilization (autoclave)
- Dynamic Air Removal (Air is removed from the chamber prior to introduction of the steam)
- Pre-vacuum Steam (Air removed under negative pressure)
- Steam Flush Pressure Pulse (SFPP) (Air removed by positive pressure pulses)
- Gravity Displacement (As steam enters it pushes the air down the drain)
- 3. IUSS (Immediate-Use Steam Sterilization) (For emergency situations)
Dry Heat (Without moisture, hotter temperatures [320- 330° F / 160-165° C] are needed to kill microbes)
Chemiclave (Alcohol and formaldehyde vapor)
Ethylene Oxide (EO Gas; Process can take from 3 – 24 hours since off-gassing (aeration) is required)
Disinfection
Glutaraldehyde/other disinfectant immersion (Because of time required for liquid chemical germicides to sterilize [ ~10 hours] these are usually used to merely disinfect)
Loading the Sterilizer
Load the sterilizer according to the manufacturer’s instructions. Only use devices that are cleared by the FDA for sterilization. Do not overload the chamber; sterilant must be able to contact all sides of the package. Place concave items downward so they will drain.
What About Immediate-Use Steam Sterilization (IUSS) Formerly Known as ``Flash``?
OSAP recommends that for routine instrument processing, always package items and use standard sterilization cycles. The “flash” cycle on a steam sterilizer processes items to be used immediately, such as if an instrument is dropped during treatment and no replacement is available. Never flash sterilize implantable devices.
Steam Sterilization Times and Temperatures for Packaged Items

Unloading the Sterilizer
The door may be opened slightly at the end of the cycle and the items left inside for a period of time in order to reduce the potential for condensation formation. The time allowed for cooling should take into account the type of sterilizer being used, the design of the device being sterilized, the temperature and humidity of the ambient environment and the type of packaging used. Avoid directly touching the items while they are hot.
A minimum cooling time of 10 minutes is recommended. Check to be sure items or packs removed from the sterilizer are dry, cool and undamaged.
Storage
Clean supplies and instruments should be stored in closed or covered cabinets, if possible. Supplies and instruments should not be stored under sinks or other locations where they might become wet. Be very careful that packages are stored correctly and not stacked several high or deposited into drawers and the drawer slammed shut. In general, the temperature in the storage area should not exceed 24°C (75°F) and the relative humidity should be controlled so that it does not exceed 70%.
Use
Always thoroughly inspect sterile packages prior to use. If the package is moist, torn, breached or otherwise compromised, clean the contents, repackage using new packaging and sterilize the package again. If packages are to be used immediately, distribute to chairside and leave packaging intact until instruments are ready to use.
Information for Patients
Conclusion
It has become apparent that the appropriate use of Infection Control practices is vitally important in the Dental Industry. OSAP has been providing Dental Practitioners with information that is helpful in reassuring patients who may become fearful of receiving dental care due to anxiety regarding appropriate infection control practices.
- Inform patients that the practice uses evidence-based infection control precautions as recommended by the Centers for Disease Control and Prevention. The latest recommendations and other resources can be downloaded from the CDC at . gov/oralhealth/infectioncontrol/index.htm.
- Explain that dental anesthetics are provided using sterile single-use needles and cartridges of anesthetic and that these items are properly discarded after each patient.
- If IV medications are used, those medications are either from single-dose vials or that multi-dose vials are accessed only once with a single needle and syringe and that additional medications, even for a single patient, are drawn with a new syringe and needle.
- Provide an explanation of the sterilization process, including thorough cleaning, examination and then sterilization of instruments.
- Reassure patients that instruments are maintained in sterile pouches or wrap until they are needed for patient care. It may be particularly useful to only open sterile packaging once patients have arrived, so they may see for themselves that the instruments are properly packaged.
- Discuss processes used for sterility assurance, including chemical indicators on and/or in packs of instruments and the regular monitoring of the sterilization process though the use of a biological indicator (spore test).
- Reassure the patient that all procedures requiring licensure or certification are provided only by professionals licensed to provide those services. More information may be found through the American Dental Association (www.ada.org).
CDC, AAMI and OSAP provide guidelines and recommendations for sterilization packaging and processes in dental practices. There are multiple sterilization packaging options to choose from. Determine your needs and research the various packaging choices before you select a material that is right for your practice.
Sources
- The Organization for Safety, Asepsis and Prevention (OSAP), From Policy to Practice: OSAP’s Guide to the Guidelines, 2004-2012, OSAP, Annapolis, MD.
- Centers for Disease Control and Prevention (CDC), MMWR, Guidelines for Infection Control in Dental Health-Care Settings – 2003, December 19, 2003.
- Occupational Safety and Health Administration (OSHA), Occupational Safety and Health Standards: Bloodborne Pathogens Standard, 29 CFR 1910.1030, December 6, 1991.
- Bagg, J., MacFarlane, T.W., Poxton, I.R., Smith, A.J., Essentials of Microbiology for Dental Students: Second Edition. Oxford University Press, 2006.
- Cash, Robert G., Trends in sterilization and disinfection procedures in orthodontic offices. American Journal of Orthod. Dentofac. Orthop. 1990; 98(4).
- Gamer, Simon, Sterilization Methods for Dental Instruments and Materials. Dental Student’s Magazine 1965: 43.
- Goodman, Harold S., Carpenter, Ron D., Cox, Mark R., Sterilization of dental instruments and devices: An update. American Journal of Infection Control 1994; 22(2).
- Hurtt, Craig A., Rossman, Louis E., The Sterilization of Endodontic Hand Files. Journal of Endodontics 1996; 22(6), The American Association of Endodontics.
- Miller, Chris, All sterilization methods have their pros and cons. RDH 1994; 14(11).
